Showing posts with label Fall. Show all posts

Tuesday, October 30, 2012

Campus Style: An I Love Lucy Outfit

Megan Thompson, student at the Cronkite School of Journalism majoring in broadcasting, has poignantly elegant, yet such a girly and casual look that I finally had the courage to ask her if she would allow me to feature her style as part of our new up and coming page, Campus Style. She also reminds me so much of Cinderella and Snow White.

She bought her dress at Forever 21, and her boots at a boutique shop at of Arizona's shopping centers - Arizona Mills.

She says that the dress is her biggest bargain, and here's why:

"It cost around $15, and it is the easiest outfit to put together," Megan says. "Dresses look super 'done-up' without all the work of picking a pants, shirt, jacket, etc."

If our outfit could sing, she further says, it would be singing the charming "I Love Lucy" theme song. A perfect match with her polka dot on polka dot!

"Fashion, to me, means understanding personality. My style shows off spunk, excitement, professionalism and edge. I like weird things that are different. I feel like I am treated in a more positive way when I take time to take care of myself and put effort into my appearance. I think looks do mean a lot, but not in a narcissistic way...more like, you appreciate and take care of yourself, so others will respect you and your personality."

Give the post a "like" if you enjoyed it & love Megan's outfit! 

-Over and out, kitty cats-


Sunday, October 21, 2012

One Last Fall Fashion Post: Boots

I was going to post about my Taylor Swift inspired weekend today, but I'll save that for tomorrow.
Instead, I want to finish off our transition into fall fashion week with a spotlight on two cool ways I saw this week of wearing boots.
The looks both gals went for were somewhat risque in the way that not many would attempt them (isn't that what fashion is all about anyway?), but they pull it off pretty well. Just a reminder to take risks when styling a simple, staple piece this fall.
Lastly, a big thank you to these ladies who let me stop them for a quick shot!

Meow and out, Gabee


Thursday, October 11, 2012

Scarves, Scarves, Scarves Pt. 2

We are finally seeing some fall weather here in the valley which makes me really happy, but, unfortunately, makes my back and joints really upset. So today's post is just going to be a quick one on the subject of one of my favorite chilly weather accessories: Scarves
Last year I shared with you this video from Wendy's Lookbook (definitely worth checking out her channel!): 


This year, I wanted to share with you a website: scarves.net
They sell discount scarves-- they also have a 15% Fall Sale going on-- and offer all sorts of resources from how to tie a scarf to how to clean them. 

http://www.scarves.net/scarf-tying-index.html
-Gabee

Tuesday, October 9, 2012

Dear Pink, I Need a Break...


Available here for $19.80
For as long as I can remember, pink has been my favorite color. Sure there was that phase where I wanted nothing more than to wear my purple sneakers, but I still came home to a pink room.

This was only meant to be a quick outfit of the day post, but yesterday in class (don't fret, I was finished with an exam early, which I passed with a 100 percent; that's right, I'm a PowerPoint expert) I discovered something as I looked through Forever 21's "Uptown Girl" looks. I'm over pink.

Normally, if an item comes in pink, I choose it over the other colors. Then I saw this top, and I found myself leaning towards the minty blue one--in a perfect world, I'd get both-- and realized I've been wearing and buying a lot of blue lately.

So pink, looks like this might be it... just for a while. It's not you. You're still super cute and pretty flattering on me,  I just need to try something new. Yes, there's someone else. It's blue.

These are a few of my favorite blue things at the moment:
Shoes: Cathy's at Arizona Mill's Mall $15 
Blue mini skirt: Ross $8
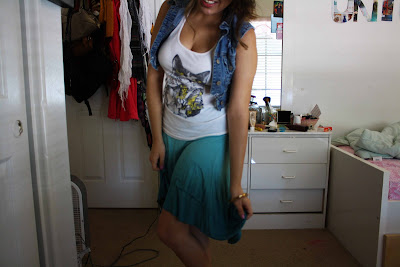
Ombre high-low skirt: gift
Sweater: Ross $9.99
Necklace: Old Navy $1.99 
L'oreal nail polish in Now You Sea Me: Target $4.99
Love & Beauty blue glitter polish: Forever 21 $1.99 or $2.99


And this is how I wore the ombre skirt:

Cat tank top: Ross $6.99
Denim vest: DIY
Cheetah (or leopard?) loafers: Ross $12

Meow, Gabee.


Sunday, October 7, 2012

Wearing the Peter Pan Collar


Maude Adams as Peter Pan
We've shown you how to create your own Peter Pan collar, so I figured I'd show you how I typically wear the two I made.
First though, I thought I'd share a fun, somewhat educational, fact about the Peter Pan collar. Despite its name, it doesn't have much to do with J.M Barrie's or Disney's character who in fact does not wear this type of collar. The name became synonymous with the character after Maude Adams' theatrical performance in Peter Pan in the early 1900s!
The collar has since been seen in a lot of children's clothes and, as of lately, on fashionable celebrities, such as Rachel Bilson and Alexa Chung , in different colors and styles.

Here is how I wear the ones I made:
The first is the one we showed y'all how to make. Because of the green and blue beads, I like to wear it with similar colors or something creamy. I've also worn it with a simple white tank and black jeggings to glam up the look a bit.

The next one I made using the same fabric from the sleeves I cut off from the dress. I simply added extra pieces of fabric at the end of the collar to give it some definition as it somewhat blends in with the dress. This is the only way I've worn this one, but I can definitely see myself wearing it with a simple black top or dress.


Thank you for reading, and if you try out our DIY, make sure to send us pictures of your results by posting on our Facebook page or via Twitter!
Hope you all had a lovely weekend.<3
Meow & Out, Gabee

Friday, October 5, 2012

A Chatoyant Creation: Peter Pan Collar

Hi kitty cats, today we're introducing a new segment aptly named "A Chatoyant Diary Creation" for do it yourself (DIY) projects we think you may be interested in. Also please excuse the quality of the images on this one. We tried making it a video, but turns out it's a lot harder to edit one than expected. Enjoy!
---------------------------------------------------------------------------------------
The peter pan collar has been making its way into fashion for quite sometime now, but this fall, it is establishing itself to be a huge must-have. You can go out and buy yourself a new top or dress that already comes with a collar or even a just the collar, but here at Chatoyant, we believe in frugality so we are teaching you how to make your own to add to pieces you already own thus saving you a few bucks.
All the supplies can be found at your local crafts store and should total to about $15-20. Now that may seem a bit pricey, but you are definitely getting a bang for your buck as this is enough material for at least five collars depending on how much fabric you have-- we used the fabric we bought along with other scraps we found laying around. Doing this with a friend and splitting the cost is a good idea!

What you'll need: 

  • Some sort of template for your collar. You may create your own or you may use this one from Honestly WTF.
  • Sewing or embellishment glue
  • Scissors or a fabric cutter
  • Beading and/or gems in the size and color of your choice
  • Thread and needle
  • Fabric--enough for your template 
  • Ribbon
  • Buttons (optional)


1 and 2: Cut out your template and trace it onto your fabric. Make sure the pencil or marker you use is safe to use on the fabric. Then cut the traced portion.
3 and 4: Carefully add enough glue for the thickness you want your beads to be and place your beads. I added about a an inch long amount of glue at a time to avoid it drying out. This is the lengthiest part of  the DIY, but it might depend on the person (Took me, Gabee, about an hour as opposed to taking Noemi about 10 minutes).
5. Measure ribbon around your neck approximately an inch or two longer to where you want your collar to sit and cut it in half. Next, sew and/or glue (I did both) each strand to the back of each piece of the collar.
6. Connect both pieces of your collar. You can do this by simply sewing and/or gluing (Again, I did both) the two together. You may also choose to use a button to connect the two.
7. TADA! You have your perfect fall accessory!